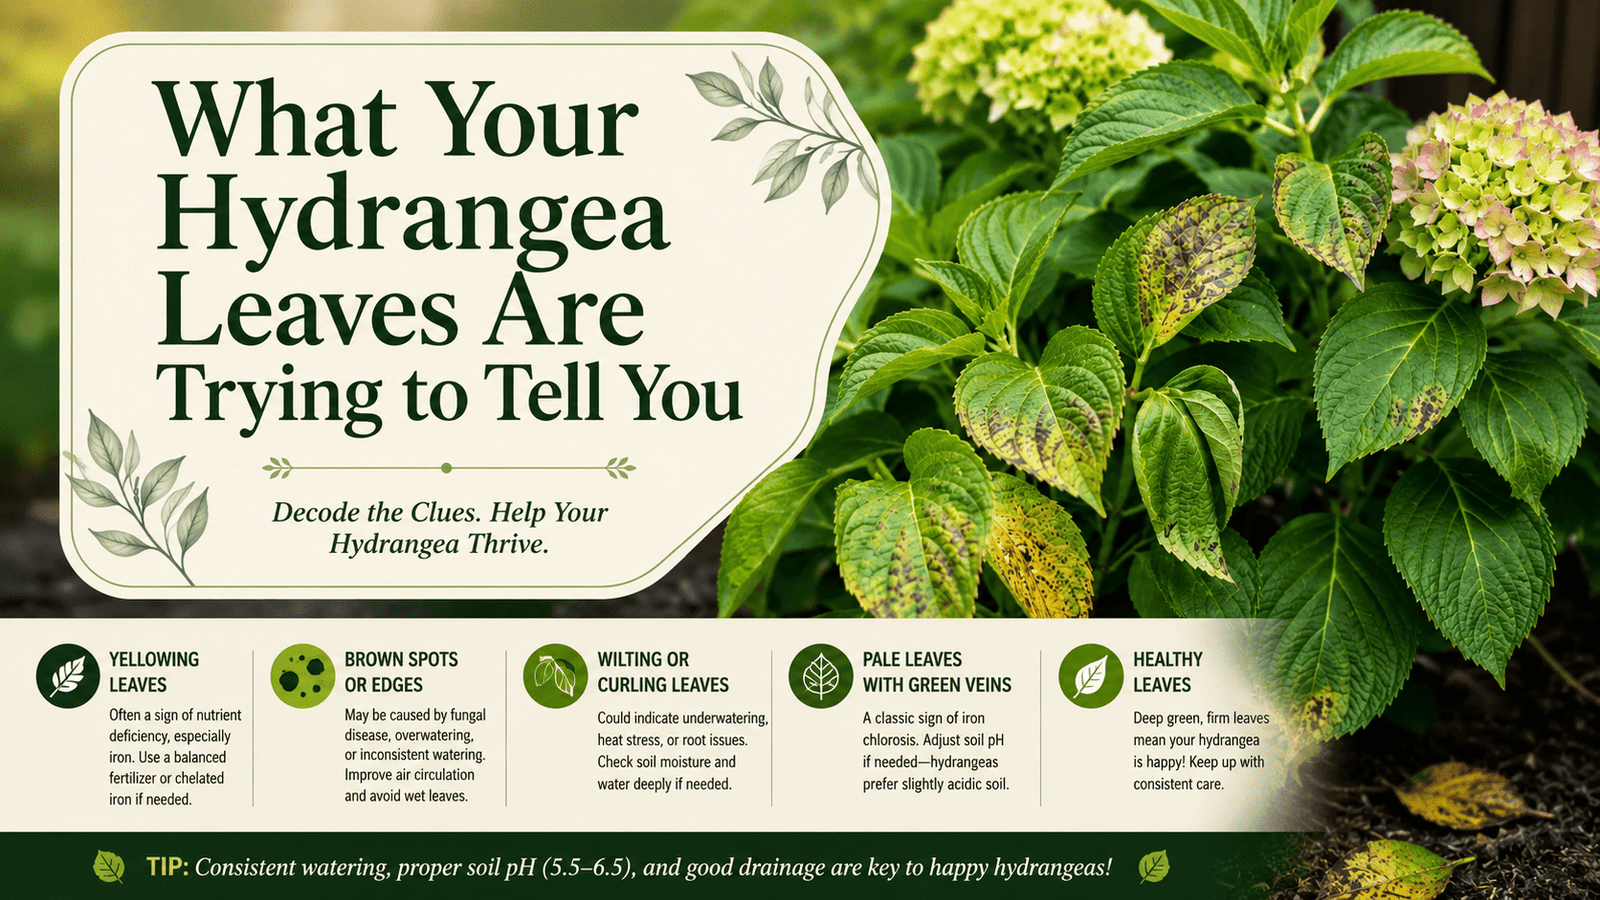
Hydrangea leaf spots can make a healthy shrub look much worse than it really is. Small purple dots may appear near the bottom of the plant. Brown or black patches can spread after several rainy days. Some leaves may turn yellow and fall before summer is over.
Before reaching for a spray bottle, take a close look at the pattern. Several different problems can cause spots on hydrangea leaves. Fungal disease is common, but heat, water stress, poor drainage, and chemical damage can create similar symptoms.
At Bobby & Lynn’s Plant Farm in Dallas, Georgia, we notice hydrangea leaf spots most often during warm, humid weather. They become especially noticeable after frequent rain or when the foliage stays wet for long periods.
Quick Answer: What Causes Hydrangea Leaf Spots?
The most common causes of hydrangea leaf spots include:
- Cercospora leaf spot
- Anthracnose
- Bacterial leaf spot
- Powdery mildew
- Heat or sun damage
- Water and root stress
- Fertilizer or chemical injury
UGA Extension lists Cercospora leaf spot, anthracnose, bacterial leaf spot, and powdery mildew among the diseases that can affect hydrangeas. (UGA Cooperative Extension)
Start by examining the spot’s color, shape, location, and pattern. Then think about the recent weather, watering habits, and anything applied near the plant.
Hydrangea Leaf Spots: Quick Identification Guide
| What You Notice | Possible Cause | First Step |
|---|---|---|
| Small purple or brown spots on lower leaves | Cercospora leaf spot | Remove fallen leaves and keep foliage dry |
| Larger brown or black patches with pale centers | Anthracnose | Improve airflow and clean up debris |
| Angular spots that follow the leaf veins | Bacterial leaf spot | Avoid overhead watering and sanitize tools |
| White or gray powder on the leaves | Powdery mildew | Reduce crowding and improve airflow |
| Crispy tan edges or bleached areas | Heat or sun damage | Check soil moisture and afternoon exposure |
| Yellowing with brown patches | Water or root stress | Inspect drainage and soil moisture |
| Sudden irregular burned areas | Spray or fertilizer injury | Stop treatments and review recent applications |
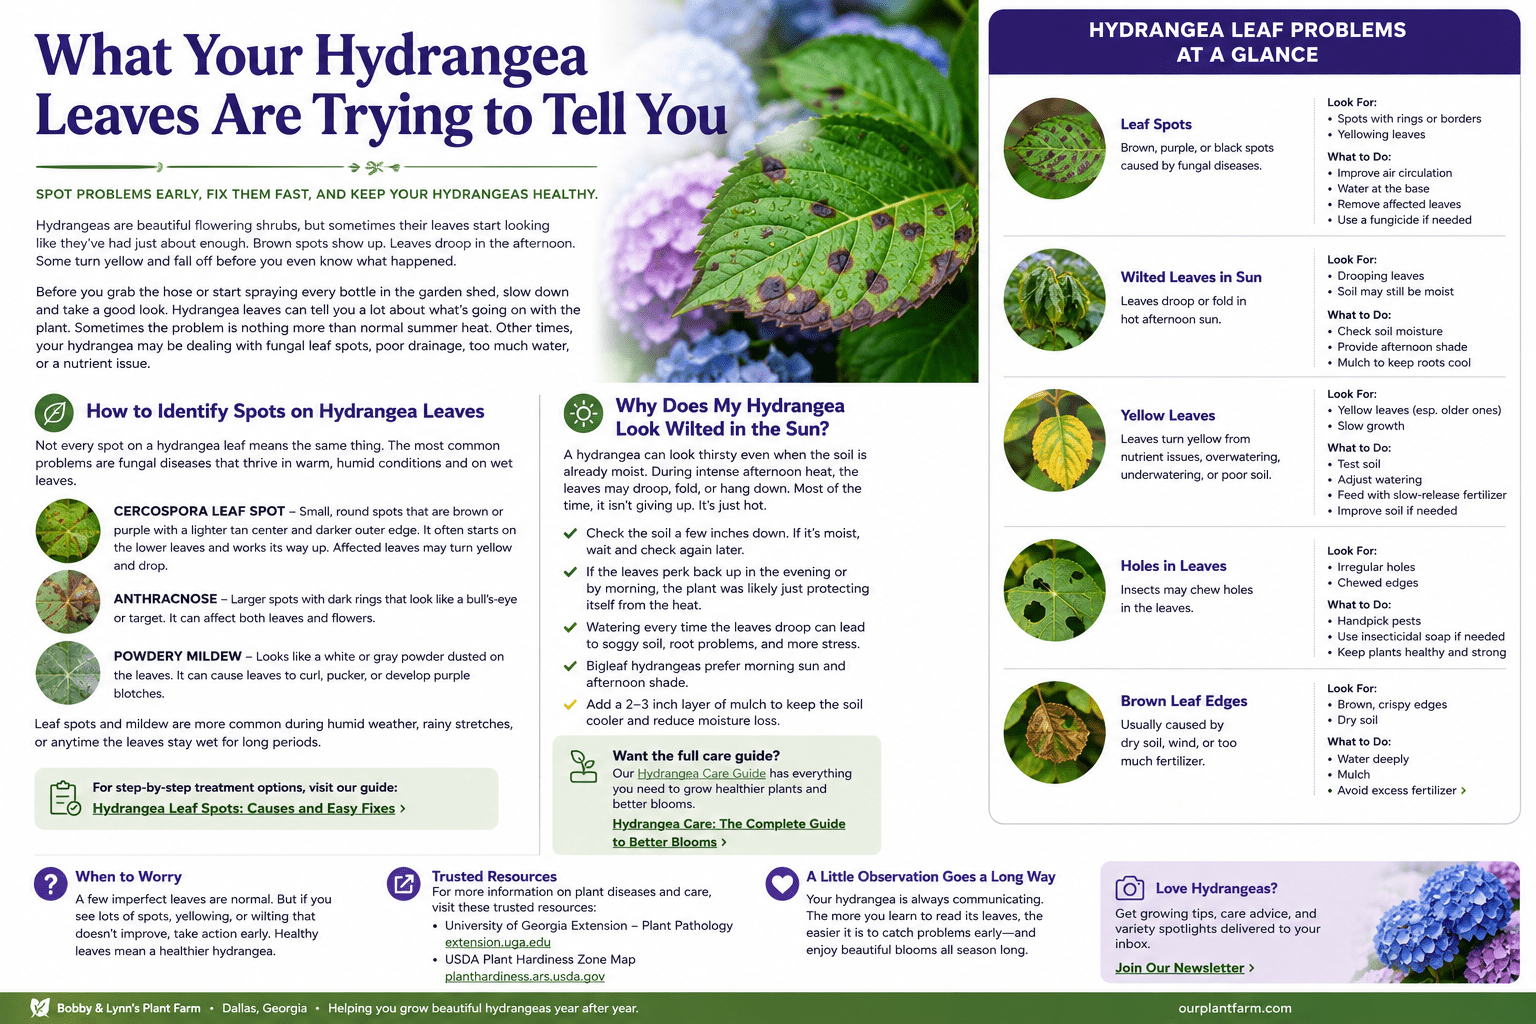
1. Cercospora Hydrangea Leaf Spots
Cercospora leaf spot is one of the most common causes of spotting on hydrangeas.
It usually begins on older leaves near the bottom of the shrub. The spots may be purple, brown, black, or tan. Many develop a pale center surrounded by a darker border.
As the problem spreads, affected leaves may turn yellow and fall from the plant. The disease often becomes more noticeable as warm, humid weather continues.
Signs of Cercospora Hydrangea Leaf Spots
Look for:
- Small round or irregular spots
- Purple or dark brown borders
- Tan or gray centers
- Damage beginning on lower leaves
- Yellowing around the spots
- Early leaf drop later in summer
A small amount of Cercospora usually affects the plant’s appearance more than its overall health. However, severe infections that return every year can weaken a hydrangea by causing repeated leaf loss.
What You Should Do
Remove heavily infected leaves when practical. Rake up fallen leaves and place them in the trash.
Water near the soil instead of spraying the foliage. Keep weeds and crowded growth away from the base so air can move through the shrub.
UGA Extension explains that many fungal leaf-spot organisms survive in infected plant debris and spread through splashing water or air movement. (UGA Cooperative Extension)
2. Anthracnose Hydrangea Leaf Spots
Anthracnose can produce larger and more irregular spots than Cercospora.
The damaged areas may have dark borders, lighter centers, or rings that resemble a target. Anthracnose can sometimes affect flowers and stems in addition to the leaves.
It often becomes more noticeable after extended rainy periods and warm temperatures.
Signs of Anthracnose
Watch for:
- Large brown or black patches
- Pale centers with darker rings
- Spots that merge into larger dead areas
- Damage on both leaves and flowers
- Tissue that looks scorched or sunken
Anthracnose and Cercospora can look similar. Photographs may help, but a reliable diagnosis sometimes requires a plant sample.
What You Should Do
Remove infected debris and keep water off the foliage. Avoid handling the plant while the leaves are wet because moisture can help spread disease.
When the damage is severe or returns every year, contact your local UGA Cooperative Extension office for help identifying the problem.
3. Bacterial Hydrangea Leaf Spots
Not every hydrangea leaf spot is caused by a fungus.
Bacterial leaf spots may appear dark, water-soaked, or angular. Leaf veins can limit the damaged area, creating a blocky pattern rather than a round spot.
UGA’s guide to common Georgia landscape diseases describes bacterial spots on oakleaf hydrangea as angular and purplish, with damage developing along the leaf veins. (UGA Cooperative Extension)
Signs of Bacterial Leaf Spot
Look for:
- Dark or water-soaked patches
- Angular spots between the veins
- Yellow halos around the damage
- Rapid spread during wet weather
- Dead tissue that tears or falls away
What You Should Do
Avoid overhead watering and working around wet plants. Remove badly affected leaves and sanitize pruning tools before using them on another shrub.
Do not automatically apply a standard fungicide. A product intended only for fungal disease will not control a bacterial infection.
4. Powdery Mildew on Hydrangea Leaves
Powdery mildew usually looks different from traditional hydrangea leaf spots. It creates a white or gray powdery coating on the leaf surface.
Affected leaves may also curl, pucker, turn purple, or become distorted.
Powdery mildew is often worse on crowded plants with poor airflow. Unlike many fungal leaf diseases, it does not require standing water on the foliage to infect a plant. (UGA Cooperative Extension)
What You Should Do
Remove the most heavily affected leaves when practical. Thin nearby plants and weeds to improve airflow.
Avoid pushing excessive soft growth with too much nitrogen fertilizer. Dense, tender growth can make disease problems harder to manage.
For help with additional symptoms, read Common Hydrangea Leaf Problems and How to Fix Them.
5. Heat and Sun Damage That Looks Like Leaf Spot
Not every brown area on a hydrangea leaf is a disease.
Strong afternoon sun can cause crispy tan edges, bleached patches, or large dry areas. Reflected heat from brick, concrete, patios, and driveways may make the problem worse.
Sun damage generally appears on the most exposed part of the plant. Fungal leaf spots are more likely to begin on lower or interior leaves where moisture and poor airflow are greater.
Signs of Heat or Sun Damage
- Dry, crispy leaf edges
- Tan or bleached patches
- Damage concentrated on one side
- Afternoon wilting
- Brown areas without purple borders or rings
What You Should Do
Check the soil several inches below the surface before watering. When it feels dry, water deeply around the root zone.
Apply two to three inches of mulch to help hold moisture and keep the soil cooler. Leave a small open space around the main stems.
Bigleaf hydrangeas often perform best with morning sunlight and protection from intense afternoon heat. Our guide to growing hydrangeas in Georgia explains how sunlight, heat, soil, and watering affect these shrubs. (Bobby & Lynn’s Plant Farm)
6. Why Are My Hydrangea Leaves Wilting?
Hydrangeas often droop during the hottest part of a summer afternoon. Their large leaves lose moisture quickly, especially when the plant receives strong afternoon sun. If the leaves perk back up in the evening or look normal the next morning, the plant is probably reacting to temporary heat stress.
Wilting that continues into the morning may point to dry soil, poor drainage, damaged roots, or too much water. Check the soil about 2 inches below the surface before reaching for the hose. Dry soil usually means the plant needs a slow, deep watering. Wet or muddy soil means you should wait and inspect the drainage.
For a complete guide to telling heat stress from a true watering problem, read Why Hydrangeas Wilt and How to Save Them Fast.
7. Chemical or Fertilizer Damage
Sprays and fertilizers can occasionally create marks that resemble hydrangea leaf spots.
Possible causes include:
- Herbicide drift
- Insecticidal soap used during hot weather
- Concentrated liquid fertilizer
- Fertilizer granules resting against wet leaves
- Incompatible products mixed together
- A treatment applied at the wrong temperature
Chemical damage may appear suddenly after an application. It often affects the most exposed leaves rather than spreading gradually from the bottom of the shrub.
What You Should Do
Think about anything applied to or near the plant during the previous several days.
Stop using the suspected product. Do not apply another chemical in an attempt to reverse the damage.
Damaged tissue will not repair itself, but healthy new leaves may develop once the source of the injury is removed.
Why Hydrangea Leaf Spots Spread
Many fungal leaf diseases spread when spores move through splashing water.
Rain, sprinklers, and overhead watering can carry spores from infected leaves to healthy foliage. Crowded plants also remain wet longer because air cannot move easily through the branches.
Fallen leaves can hold disease organisms that return during future growing seasons. Warm, humid Georgia weather gives these problems an especially good opportunity to spread. UGA recommends sanitation, including removing infected debris, as an important part of managing landscape leaf diseases. (UGA Cooperative Extension)
How to Prevent Hydrangea Leaf Spots
Good care cannot prevent every spot, but it can reduce the severity of recurring problems.
Water Near the Base
Use a soaker hose, drip irrigation, or a slow stream directed toward the soil.
When overhead watering cannot be avoided, water early enough for the foliage to dry before evening.
Remove Infected Leaves
Pick off a limited number of badly affected leaves when the problem is just beginning.
Rake up fallen leaves and place them in the trash. Do not leave infected debris beneath the shrub through winter.
Improve Air Circulation
Allow enough room for the hydrangea to reach its mature size.
Remove weeds and crowded growth around the plant. When pruning is appropriate for your hydrangea type, remove dead or crossing stems that restrict airflow.
Be careful about pruning time. Some hydrangeas flower on old stems, and pruning them at the wrong time can remove the next season’s buds. Read How to Prune Hydrangeas: A Simple Guide for Every Type before cutting the shrub back.
Maintain Steady Soil Moisture
Water deeply rather than applying a small amount every day.
Mulch can reduce moisture swings and prevent rain from splashing soil onto the lowest leaves.
Avoid Unnecessary Fertilizer
Too much nitrogen can produce dense, soft growth and may make airflow through the plant worse.
Fertilize according to the plant’s needs rather than following a fixed schedule. Your local UGA Extension office can also help arrange a soil test.
Should You Remove Every Spotted Hydrangea Leaf?
No.
Removing a few badly affected leaves can help when the problem is limited. Stripping most of the foliage from the shrub may cause more stress than the disease itself.
Hydrangeas need their leaves to produce energy. When spots are widespread, focus on:
- Cleaning up fallen debris
- Keeping foliage dry
- Improving airflow
- Correcting watering problems
- Protecting healthy new growth
Leaves that are already damaged will not become clear again. Judge your progress by whether the new growth stays healthier and the spotting slows down.
Do Hydrangea Leaf Spots Require Fungicide?
Mild spotting often does not require a fungicide.
Cleaning up infected leaves, adjusting watering habits, and improving airflow may be enough for a healthy plant. Fungicides are more likely to be considered when:
- The disease has been identified correctly
- Damage is severe
- The problem returns every year
- The plant loses many leaves early
- Treatment begins before new leaves become badly infected
Fungicides generally protect healthy tissue better than they repair leaves that are already damaged.
Before Using Any Fungicide
- Make sure the problem is fungal.
- Confirm that hydrangeas or ornamental shrubs are listed on the label.
- Confirm that the suspected disease is included.
- Follow the mixing and application directions exactly.
- Wear the protective equipment required by the label.
- Avoid spraying during extreme heat.
- Keep children and pets away for the time stated on the label.
- Never assume a stronger mixture will work better.
Product registrations and approved uses can change. The pesticide label is the legal direction for using the product.
What We See at Our Plant Farm
At Bobby & Lynn’s Plant Farm, hydrangea leaf spots often become noticeable after stretches of warm, rainy weather.
The problem commonly starts on the lowest leaves. Those leaves receive less air movement and are more likely to be splashed with soil and water during rain.
A hydrangea may still be growing and blooming well even though the lower portion looks rough. That is why we do not automatically assume the shrub is dying.
We also see people water more after spotted leaves begin yellowing or drooping. When the soil is already wet, additional water can create more root stress.
Our first steps are simple:
- Check the soil moisture.
- Examine where the damage started.
- Remove fallen infected leaves.
- Keep water off the foliage.
- Improve airflow around the shrub.
- Watch the condition of the new leaves.
A few spotted leaves usually do not mean the hydrangea needs to be removed.
Hydrangea Leaf Spot Checklist
Before choosing a treatment, ask:
- Did the spots begin near the bottom of the plant?
- Are they small and purple, brown, or tan?
- Do they have pale centers or dark rings?
- Are they angular and limited by veins?
- Is there white powder on the foliage?
- Did the problem appear after rainy weather?
- Are sprinklers wetting the leaves?
- Does the soil stay soggy for several days?
- Is another plant crowding the hydrangea?
- Was fertilizer or a spray applied recently?
- Do the newest leaves still look healthy?
These clues can help separate disease from environmental or chemical damage.
Frequently Asked Questions About Hydrangea Leaf Spots
Will Hydrangea Leaf Spots Kill the Plant?
Most leaf-spot diseases do not kill an otherwise healthy hydrangea. However, severe infections that return year after year can weaken the plant through repeated early leaf loss.
Should I Cut Off Leaves With Hydrangea Leaf Spots?
Remove a limited number of badly affected leaves when practical. Do not strip most of the foliage from the shrub.
Can I Compost Spotted Hydrangea Leaves?
It is usually safer to place diseased leaves in the trash unless you maintain a compost pile that reliably becomes hot enough to destroy plant pathogens.
Why Do Hydrangea Leaf Spots Start at the Bottom?
Lower leaves receive less airflow and are more likely to be splashed with soil and water. They also tend to remain wet longer.
Will Rain Wash Away Hydrangea Leaf Spots?
No. The damaged areas will remain visible. Rain may spread fungal spores to healthy foliage.
Can Overwatering Cause Spots on Hydrangea Leaves?
Overwatering can cause root stress, yellowing, browning, and damaged leaf tissue. Wet conditions may also encourage disease development.
When Should I Contact UGA Extension?
Contact Extension when the damage spreads rapidly, affects several plants, causes major leaf loss, or remains difficult to identify.
Take clear pictures of the entire plant and close-up photographs of both sides of the affected leaves. Your county office may also request a fresh sample.
Final Thoughts on Hydrangea Leaf Spots
Hydrangea leaf spots can look alarming, but most cases are manageable.
Start by studying the pattern and checking the soil. Remove infected debris, water near the roots, improve airflow, and avoid unnecessary treatments.
Do not expect damaged leaves to become perfect again. Instead, watch the new growth. Healthy new leaves are the best sign that your changes are helping.
For additional help with leaf problems, pruning, watering, and blooms, visit our Hydrangea Care Guide: Better Blooms Made Easy.
You can also download our free All About Hydrangeas eBook for practical hydrangea guidance you can save and use throughout the growing season.
Discover more from Bobby and Lynn’s Plant Farm
Subscribe to get the latest posts sent to your email.